
The wedding invitation suite is where all the pieces of your big day come together. While the save the date might have given guests a little teaser, the invitation suite is where the full story unfolds. It’s your chance to share important details while setting the vibe and building excitement. The wedding invitation suite should be the perfect blend of style and substance, making sure your guests are both informed and ready to celebrate.
From classic elegance to modern flair, there’s no shortage of wedding invitation ideas to drum up excitement for the big day. If you’re looking for complete wedding invitation suite examples to inspire you, you’re in the right place! We’ve got everything to help you create the perfect wedding stationery set for your special day.
- A wedding invitation suite traditionally includes the ceremony invitation, RSVP card and enclosure cards with essential guest information.
- Get a polished, professional look by using cohesive design across paper type, color palette and typography.
- All-in-one invitation formats offer modern, budget-friendly alternatives to traditional multi-piece suites.
- Envelope weight and size directly impact postage costs, weigh your complete suite before ordering stamps.
- Order 10% extra invitations for keepsakes and last-minute guest additions.
What is a wedding invitation suite?
If you’ve ever wondered “what is an invitation suite?” A wedding invitation suite is a carefully curated collection of cards that provides guests with all the important details about your ceremony and celebration. It simply refers to all the coordinated pieces that go into your wedding stationery, not just the main invite. Beyond sharing the when and where of everything, it gives a clear sense of the wedding’s overall style and atmosphere. While save the date cards offer an early glimpse, the invitation suite sets the stage for what guests can expect, tying together all the information in a clear and personal way.
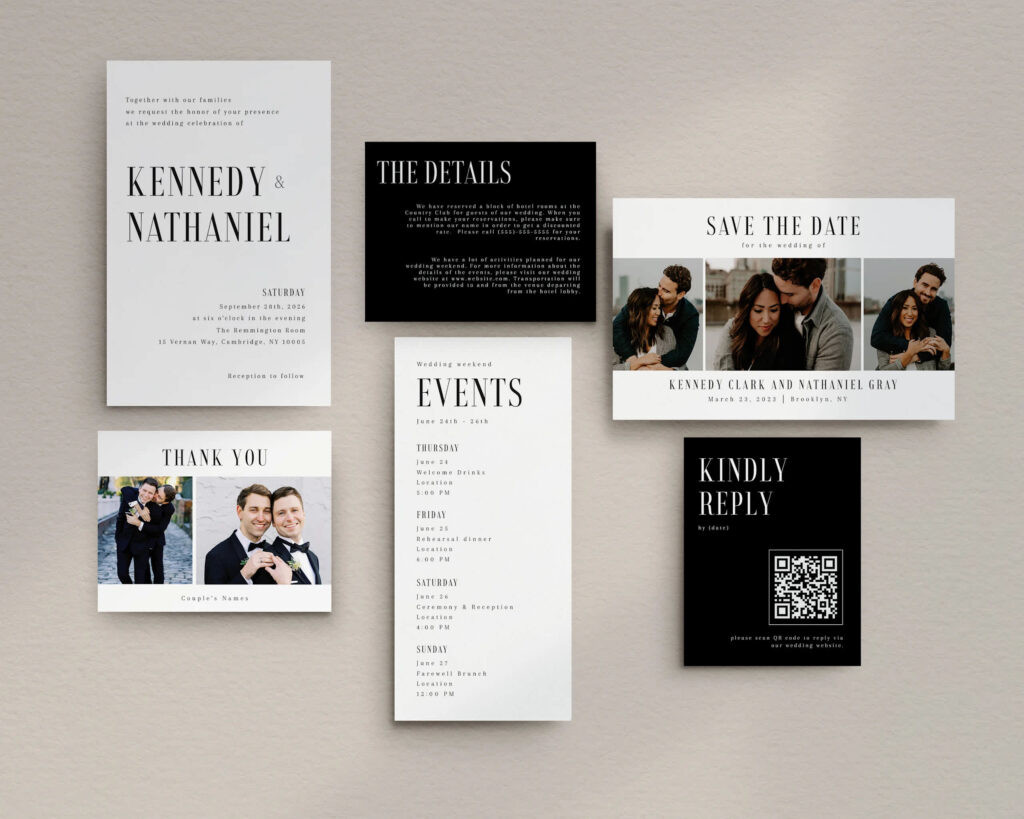
In addition to the ceremony invitation, a typical wedding invitation suite includes an RSVP card and enclosure card with all the details guests need to know in one tidy package.
Each component of the suite should be consistent in style, color palette and theme, setting the tone for the wedding day. The invitation suite can also be customized with wedding monograms and motifs to reflect the couple’s unique style and wedding aesthetic.
It’s always wise to order a free wedding sample kit to help choose designs and finishes as well as to check the print quality, ensuring the invitation suite is exactly how you envision it.
What to include in a wedding suite?
A wedding invitation suite typically includes a few core components that keep guests informed and set the tone for your celebration. Here’s what most couples include.
A ceremony invitation is the main event card with the couple’s names, wedding date, time, venue address and any dress code information.
An RSVP card guides guests to confirm attendance, indicate guest count and share meal preferences or dietary restrictions. Many couples now include a QR code linking to their wedding website for digital responses, which saves postage costs on return envelopes.
An enclosure card is included to share additional details that don’t fit on the main invitation, like reception venue information, accommodation options, travel directions, parking details or maps. Modern couples often combine multiple details onto one card to simplify their suite and reduce costs. Note that this information can also live entirely on your wedding website.
Custom envelopes are the first thing guests see. Choose a size that fits all components comfortably, select colors that complement your wedding palette and consider pre-printed addresses or custom mailing labels for a polished look.
Do you need a wedding invitation suite?
Not every couple needs a full traditional wedding invitation suite. For many couples today, budget and convenience are top priorities. Whether you go with a full suite or an all-in-one option, depends on your wedding style, guest list and budget.
For couples seeking a more modern streamlined approach, all-in-one invitation formats combine the ceremony invitation, RSVP and details onto a single folded or accordion-style card. These consolidated designs reduce printing costs, simplify assembly and create less waste, all while expressing the personality of the couple.
Traditional multi-piece suites work best if:
- You’re having a formal or large wedding with complex logistics.
- Guests need detailed information about multiple venues, accommodations or travel.
- You want a formal keepsake that reflects an elegant celebration.
- Your budget allows for multiple printed components.
All-in-one invitations work best if:
- You’re working with a tighter budget or prefer a minimalist approach.
- Most details are available on your wedding website.
- You’re having a smaller, more casual celebration.
- You want to simplify assembly and reduce postage costs.
What’s an all-in-one invitation?
All-in-one formats combine the ceremony invitation, RSVP and essential details onto a single folded or accordion-style card. These consolidated designs can include perforated RSVP tear-offs or QR codes that link to your wedding website. They’re just as elegant as traditional suites while being more budget-friendly and eco-conscious.
Here’s why many couples still choose traditional invitation suites:
- Clear communication: The invitation suite organizes everything guests need to know, from dates and venues to accommodation details. If it doesn’t fit on the main invite, it goes on an enclosure card or on the website.
- RSVP opportunity: Most wedding invitation suites include an RSVP card, inviting guests to let you know if they can attend. Make sure the RSVP wording is clear so the process is easy to follow.
- Personalization: Custom elements like wedding logos, illustrations or monograms let couples add a bit of personality so that the suite reflects their style.
- Theme consistency: Whether you’re going for a modern, rustic or vintage vibe, the suite should be designed to match the wedding theme.
- Keepsake potential: When designing the wedding invitation suite, consider their keepsake potential as something you or close guests might want to keep as a reminder of the special day.
- Complete picture: A well-designed suite with coordinating elements demonstrates attention to detail and helps guests understand the formality level and what to expect.
If you haven’t sent a save the date, the invitation suite is your first chance to share details and build excitement. Whether you opt for a traditional multi-piece suite or a streamlined all-in-one design, the key is choosing what works for your celebration and your guests’ needs. For more guidance on deciding what elements to include, check out our article on what to include in a wedding invitation.
Optional elements of a wedding invitation suite
A wedding invitation suite doesn’t have to stop at the essentials. Additional cards often help set the mood for the event, provide important details for the day-of and/or help provide extra context for your dearest guests. If this resonates, consider these additions:
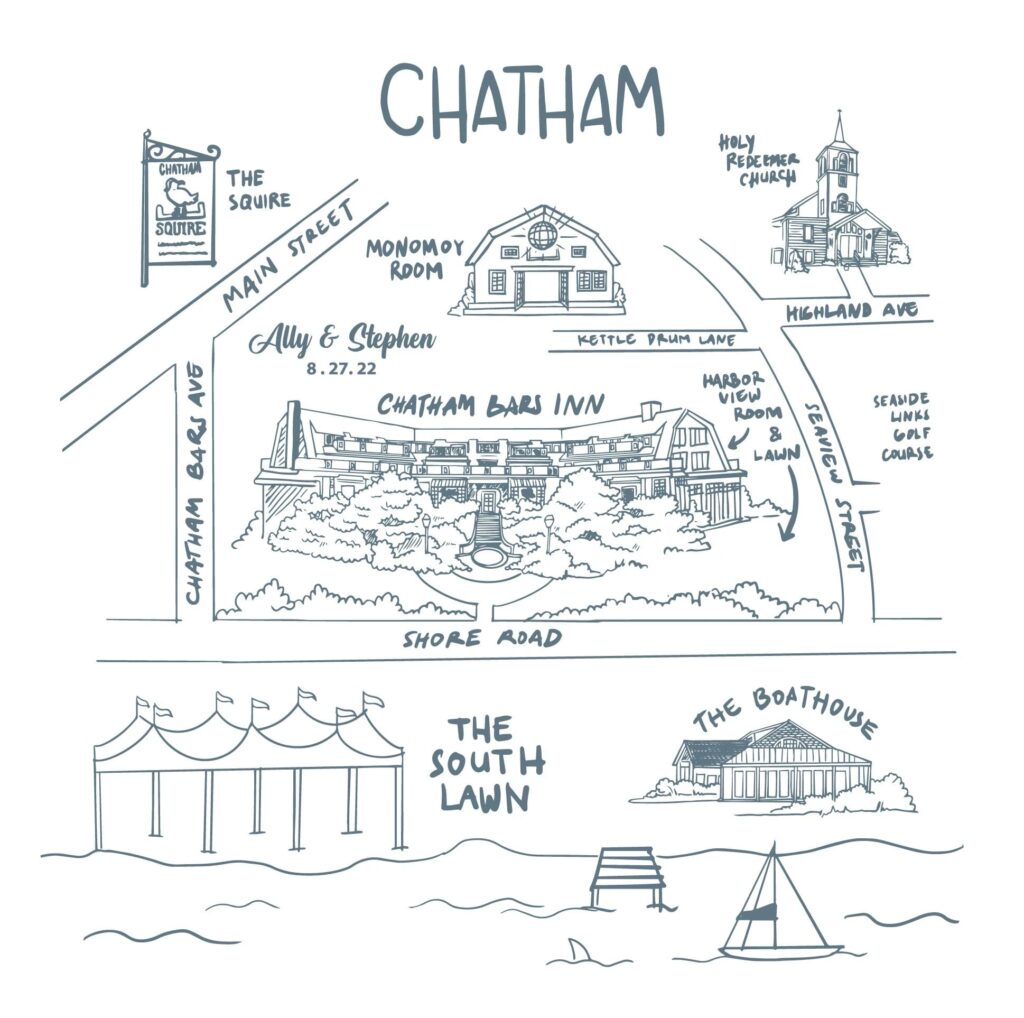
A directions or map card is a visual guide for hard-to-find venues, especially helpful for destination or remote location weddings.
Wedding programs outline the ceremony timeline so guests know what to expect throughout the day.
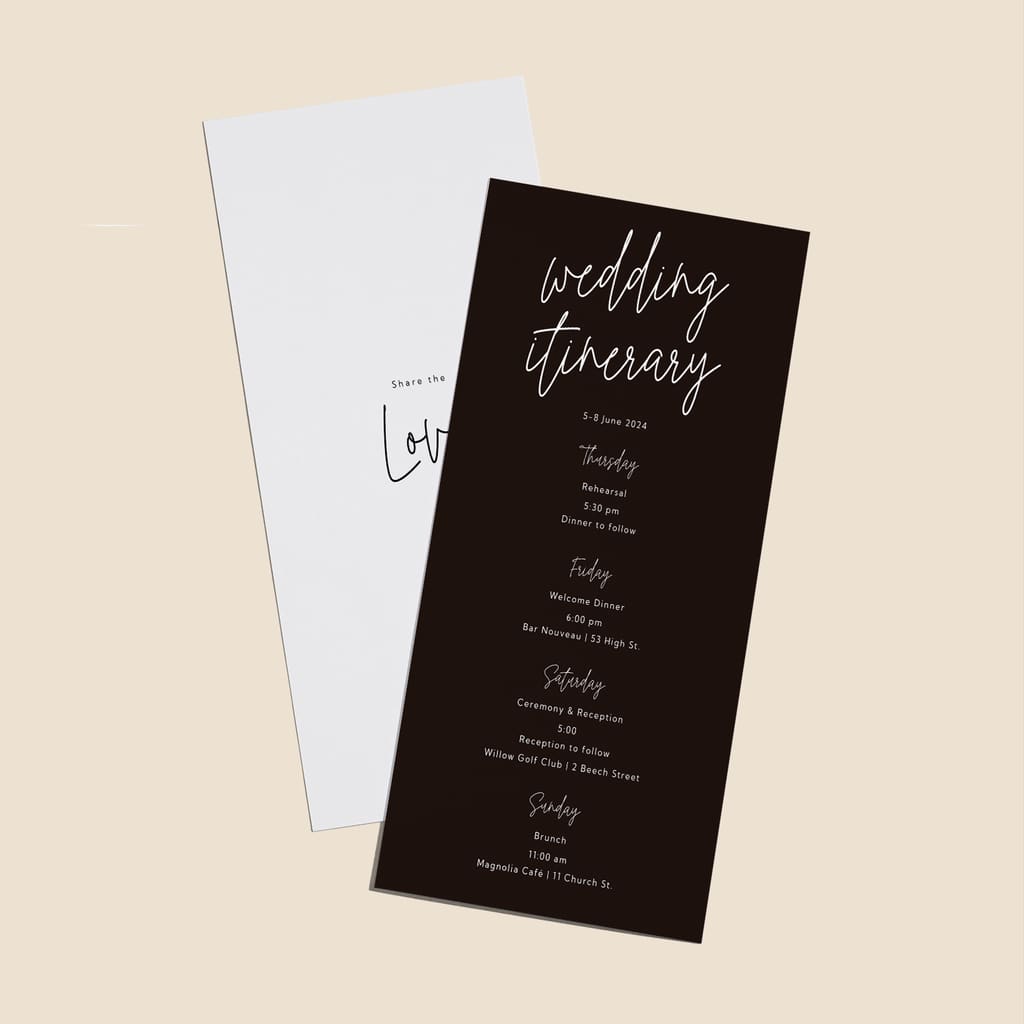
An itinerary card is essential for multi-day celebrations, listing the schedule of pre-wedding dinners, the ceremony and post-wedding brunches.
Menu cards allow invitees to consider the meal options and gather dietary requirements ahead of time. Some couples then display coordinated menus or seating cards at reception tables.
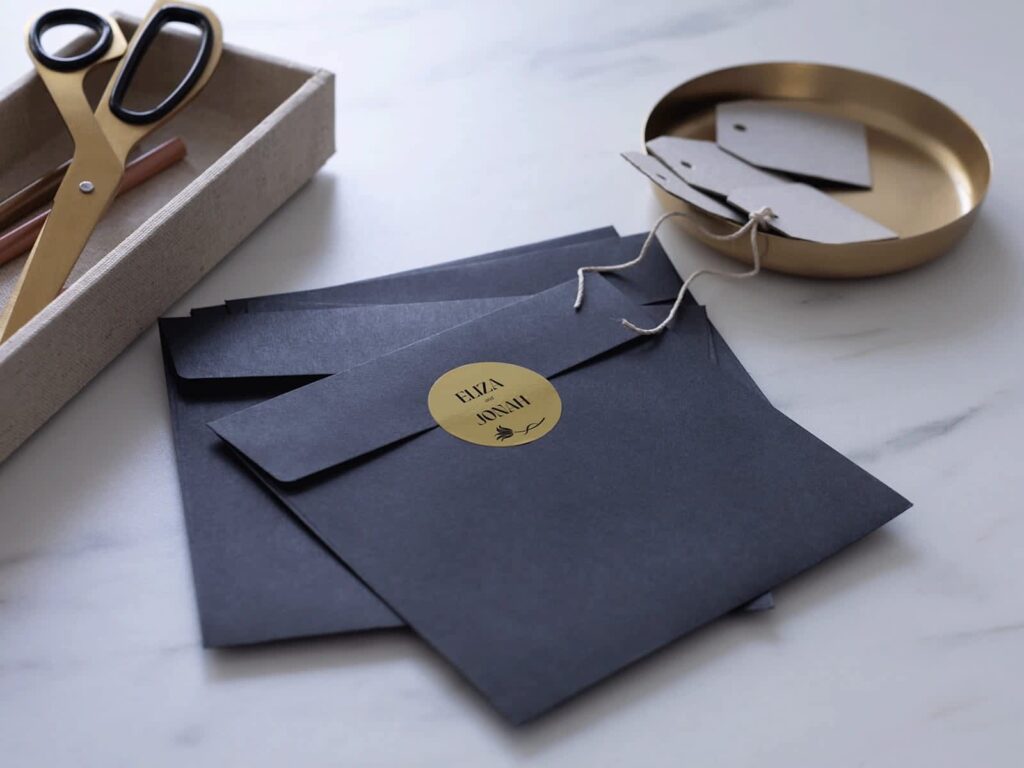
Decorative elements like custom envelope seals, stamps, ribbons or belly bands add personalization and hold components together elegantly.
An envelope liner lends a pop of color, pattern or metallic finish inside the envelope for an elevated unboxing experience.
How to create a wedding invitation suite in 10 steps
Creating your wedding invitation suite is an exciting part of the wedding planning process and when you break it down into simple manageable steps, it’s easier than you think. Here’s a general guide to help you put it all together smoothly!
Step 1. Define your vision
Start by deciding the overall look and feel of your wedding. Think about the story you want your invitation suite to tell and how it will set the tone for the wedding day. Consider the theme, color palette and style.
When defining your vision, consider themes like:
- Rustic: natural textures, earthy tones
- Modern: clean lines, minimalist layouts
- Vintage: antique fonts, ornate details
- Bohemian: watercolor illustrations, flowing typography
- Classic: elegant fonts, timeless palettes
For more guidance on choosing the right theme for your celebration, check out our guide on how to pick a wedding theme.
Step 2. Set a budget
Start by finalizing your guest list to figure out how many invitations you’ll need. Although there is a wide range in how much wedding invitations cost, couples typically spend 2-5% of their overall wedding budget on invites.
When allocating the budget, consider design, materials, printing and postage. Optional elements like custom illustrations, wax seals and envelope liners will also bump up the price. The total cost of a wedding invitation suite can range from $200 to $1,500, depending on these factors.
Next, decide whether to use VistaPrint’s customizable wedding invitation suite templates, hire a professional designer via 99designs by Vista (prices start from $200 per project), use wedding invitation design services (starting at just $10) or take the DIY route (free).
Step 3. Research inspiration
Browse wedding blogs, Pinterest and Instagram for wedding invitation ideas. To get you started, we have included some ideas and wedding suite examples below. As you research, save images of invitation designs that match your vision, noting what stands out to you. Gather these images, along with color swatches, typography and design elements to create a mood board. Then, review the mood board to identify common themes – this will help you fine-tune and guide your design choices.
If you need more guidance, check out our article on designing wedding stationery for comprehensive advice on creating cohesive designs.
Step 4. Decide on your printing method
Printing your wedding invitation suite at home might seem like a great way to save money, but when you think about the equipment, time and resources needed, it may not be as practical or cost-effective as it seems. If you don’t have access to a high-quality printer or the expertise to get the best results, it’s often better to leave it to the pros.
If you’ve decided to work with professionals, you’ll need to pick the printing method that fits your wedding style, invitation design and budget.
- Digital printing: Affordable and fast, this method works well for most designs and is ideal if you’re working with a tighter budget.
- Letterpress: This pricier printing method produces debossed letters and details for a timeless and elegant look with a more luxurious feel.
- Foil embellishments: If you’re after a high-end metallic finish, foil embossing adds a striking and glamorous touch, perfect for invitations with an extra wow factor.
One often-overlooked factor in printing is how paper weight and texture interact with your chosen method. Heavier cardstock (110 lb or above) works beautifully with letterpress and foil stamping, creating depth and dimension. Lighter weight papers (80–100 lb) are more suitable for digital printing and keep postage costs down. Consider requesting paper samples from your printer to see how different weights feel and how ink or foil adheres to each surface.
Step 5. Choose paper type and sizes
Select paper type
Explore paper options like matte, linen, pearl or glossy, and choose one that aligns with your wedding theme, allowing for the printing method you want. Pay attention to the paper’s weight and finish – heavier, textured papers add a luxurious feel, while lighter options are more budget-friendly.
Decide on sizes
Each element in your suite should complement the others in size. Typically, the ceremony invitation is the largest, with enclosure cards slightly smaller. Make sure everything fits nicely within the outer envelope. Our guide to wedding invitation size and design elements will give you a better understanding of these important factors to consider when putting your wedding suite together.
Order a free wedding invitation sample kit to get a feel for your chosen paper type, size and materials. Seeing and touching printed wedding stationery helps you make confident decisions about the final look and feel of your invitation suite.
Step 6. Design the wedding invitation suite
If you’ve opted to use a professional design service, start by sharing your mood board and ideas with your designer. If you’re using a wedding invitation template from VistaPrint or VistaCreate, customize it with your chosen colors, fonts and design elements.
Make sure you pick fonts that are easy to read and match the vibe of your wedding. Avoid cluttering the invitation design by keeping the layout clean and utilizing white space. Finally, incorporate personal elements like a custom monogram, illustrations or unique wording that reflects your personality as a couple. You can even add a special quote, poem or phrase that holds meaning for you both.
Learn what information to include in a wedding invitation to ensure you cover all the essential details guests need.

Step 7: Proof and finalize your invitation suite
Before placing your final order, carefully review each component of the invitation suite to catch any errors or inconsistencies in the text, design or layout. Double-check every detail including names, dates, addresses and RSVP information.
Ask a trusted friend or family member to review the suite – they might spot something you missed! Make any necessary adjustments and order a free wedding sample kit before printing large quantities of wedding stationery.
Step 8. Print the wedding invitation suite
Plan to finalize your design and place your print order at least 10-12 weeks before your wedding date. This gives you time for printing (typically 1-2 weeks), delivery, assembly and addressing before mailing invitations 6-8 weeks before the wedding. When you’re ready to print, choose a printer experienced with wedding invitations who can guarantee high-quality results and meet your timeline.
Once your wedding invitation suite is printed, check the quality of the printing, the feel of the paper and any extras like ribbons or seals.
Pay attention to color accuracy when you receive your printed suite. Colors can appear differently on screen versus in print, especially for custom color matches. If your suite includes specific brand colors or you’re matching existing wedding décor, request a printed proof before committing to the full order. This extra step prevents costly reprints and ensures your vision translates perfectly from digital design to physical product.
Order a few extra copies (about 10% extra) for keepsakes and in case of late guest list additions. Better to have a few spares than to do a last-minute order!
Step 9. Assemble your wedding invitation suite
Now for the fun part, assembling your wedding invitation suite! Fair warning: this can be a tedious and time-consuming process, especially if you’re putting together 100+ suites. Turn it into a fun date night with your partner or invite your family, best man and maid of honor over for an assembly party. Start by arranging everything in order, with the main invitation on top. Add those extra special touches like belly bands, ribbons or wax seals to tie everything together (literally and figuratively!)
Step 10. Address your invitations and mail them out
For the envelopes, handwrite the addresses for a personal feel or opt for mailing labels if you want a professional-looking finish. If you’re using VistaPrint’s free envelope addressing service, all you have to do is upload the recipients’ addresses and the pre-addressed envelopes will be shipped to you ready to be sent out. Aim to mail out your invitations at least 8 weeks before the big day and up to 6 months in advance if you have guests traveling from abroad. Don’t forget to weigh your assembled suite at the post office, suites with multiple cards, ribbons or embellishments often require extra postage.
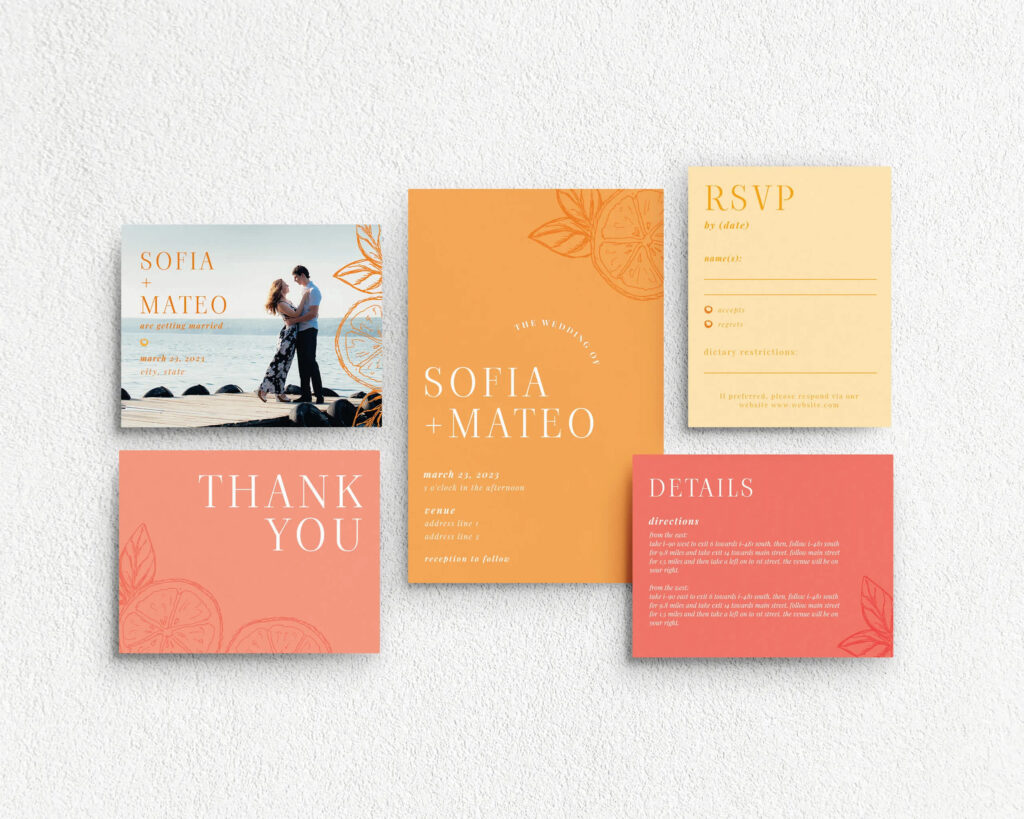
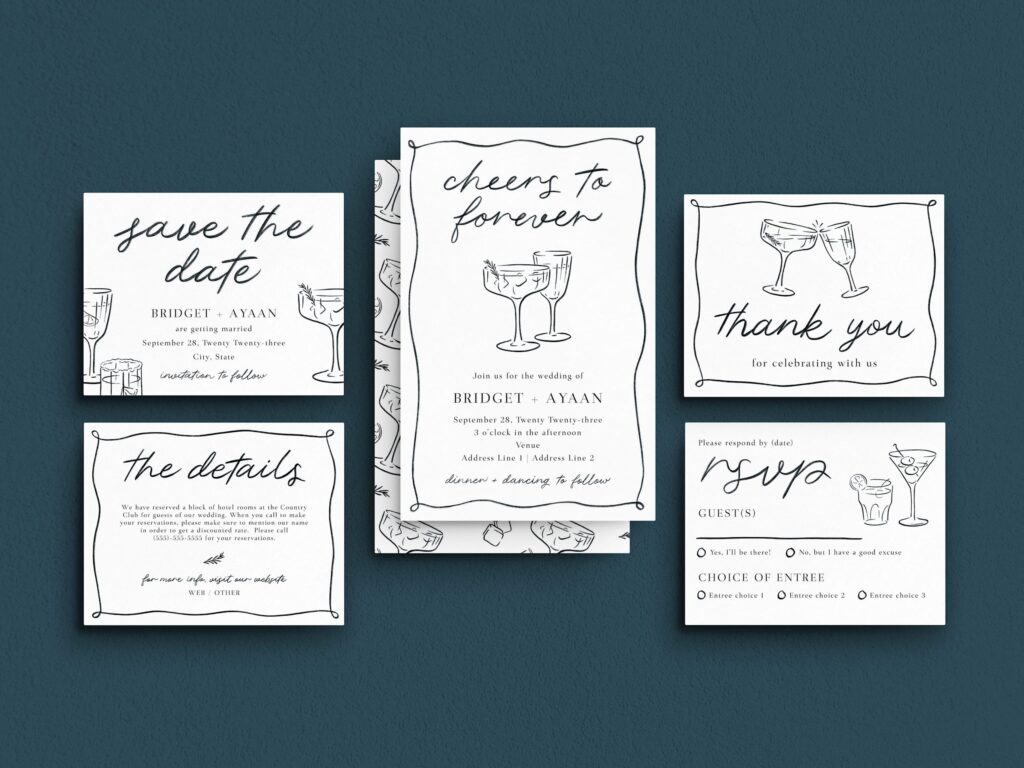
Wedding invitation suite examples
Every wedding is different, so there’s no one-size-fits-all recipe for what goes in a wedding invitation suite. Couples get to decide what they want to include, whether it’s to share important details or set the perfect tone for the big day. That said, there are a few classic elements that most people tend to use to keep things organized and cover all the essentials.
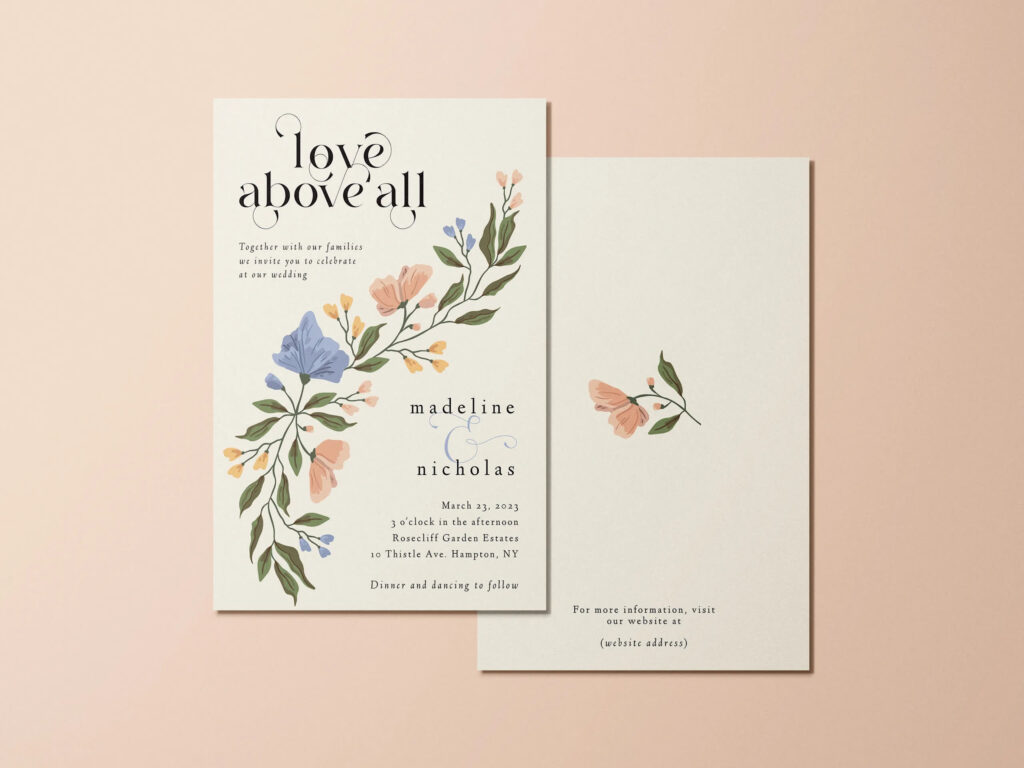
Ceremony invitation
The wedding invitation is the star of the wedding suite – it’s the big, official “we’re getting married!” moment. It’s when guests find out where exactly the celebrations will be taking place and get a sense of what to expect for the big day.
Typically, wedding invite wording includes:
- Who’s tying the knot (the couple’s names)
- When it’s all going down (date and time)
- Where it’s happening (full address)
- What to wear (if there’s a dress code)
There’s often a little space for a short and sweet message like “Join us to celebrate!” and a link to the wedding website, if you have one.
Beyond giving the details, the invitation provides an opportunity to establish the vibe, whether it’s casual, formal or somewhere in between. The wording of the invite can range from the classic “We request the honor of your presence,” to something more laid-back and fun like “We can’t wait to see you on the dancefloor.”


RSVP card
The RSVP card is a vital piece of wedding stationery. It’s how guests let the hosts know if they’re in or out, confirming names and numbers for catering and seating plans. Beyond the yes or no response, it’s also where guests can share details like meal preferences, dietary restrictions and special requests, making it a key tool for keeping everything on track.
For added convenience and cost savings, many couples now include a wedding QR code on their RSVP card, so guests can scan and jump straight to a wedding website or digital form to confirm attendance online. If you prefer the traditional route of mailed RSVP responses, don’t forget to include a self-addressed stamped envelope to keep the process simple for guests.
Things to consider including on an RSVP card:
- Accept or decline options: This is how guests will confirm who’s coming, checkmarks or circles are fine.
- RSVP deadline: Let guests when you need to have their information so planning for the venue, food and drink can be finalized in time.
- Names: This is a space for guests to fill in their names. Some RSVP cards are pre-filled just like the return envelope is self-addressed. Cover both by making the RSVP card a postcard.
- Meal options: Decide how you want guests to choose their meal preferences.
- QR code: A wedding QR code streamlines the process of keeping track of guest responses. Include simple instructions so guests know which action they should take e.g. “Please scan the QR code to reply via our wedding website.”
You can create a QR code for free using VistaPrint’s QR code generator.


Enclosure card
The enclosure card is the behind-the-scenes MVP of the wedding invitation suite. It’s where all those extra details live – the kind of stuff that doesn’t fit on the main invitation but is important for guests to know, like:
- Reception details: If the reception’s happening somewhere different from the ceremony, guests will need to know where to go, when it starts and if there’s a dress code.
- Accommodation info: Perfect for out-of-town guests, this is where you list nearby hotels, any room blocks you’ve reserved and even transportation options.
- Travel information: Directions, parking tips or shuttle details – all the logistics to make sure guests get to the right place at the right time.
- Maps: Can help guests find the ceremony and reception venue, as well as accommodation and pick-ups. Generate a QR code to provide a location pin on a digital map.
Couples often combine multiple details onto a single enclosure card to simplify their suite and reduce printing costs. This consolidated approach works particularly well for smaller weddings or couples prioritizing a minimalist aesthetic. You might include reception venue information and accommodation details on one card, keeping everything guests need in a single convenient place.
That said, some couples skip the enclosure card entirely and include this information on the wedding website instead. This approach saves on printing costs and makes it easy to update information as plans evolve.
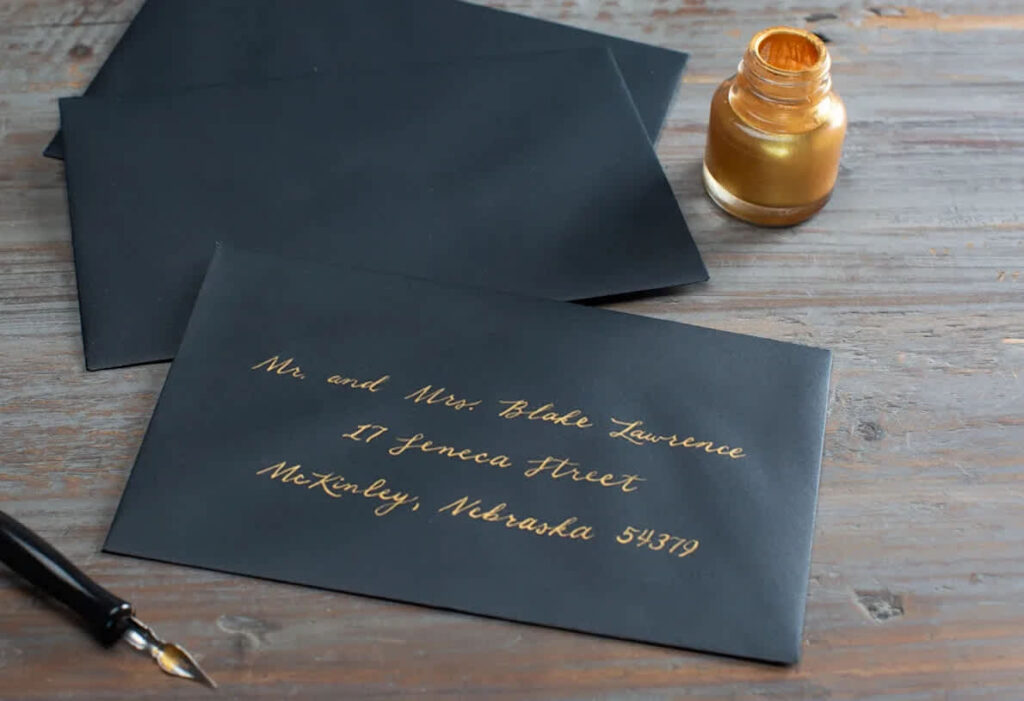
Custom envelope
A custom envelope is more than just packaging – it’s part of the experience and adds a polished and personal touch. As the first thing guests see, it should be almost as thoughtful as the invitation itself, creating excitement before they even open it. Include your wedding monogram on the envelope, so guests know what’s inside.
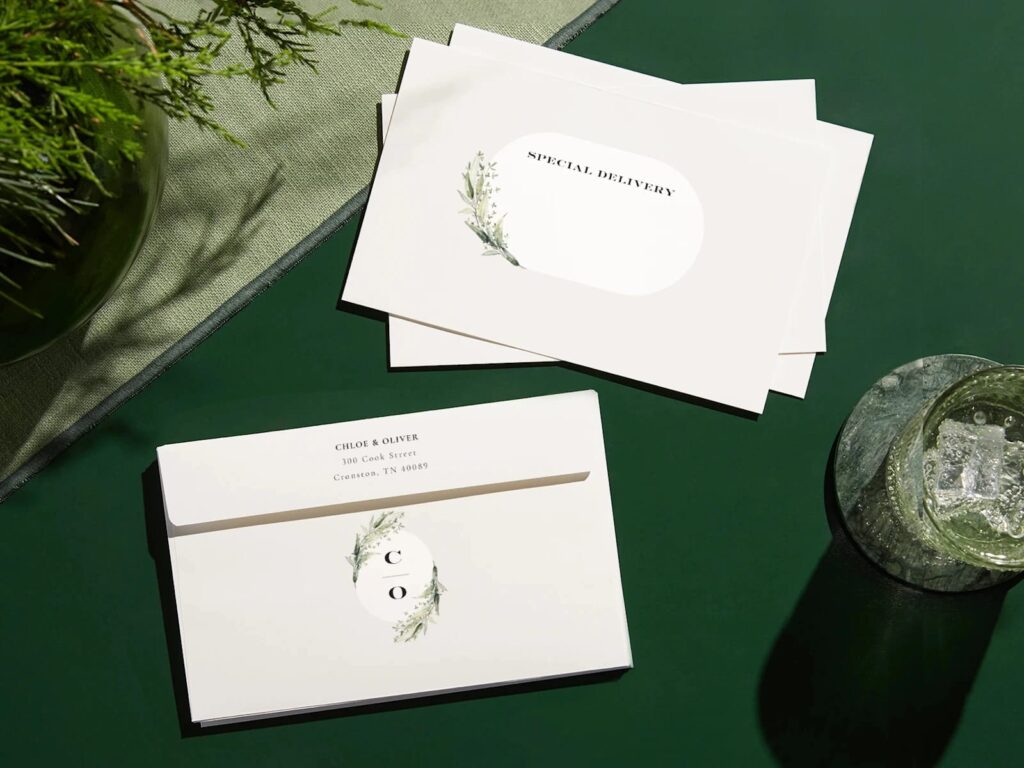
Here’s what to keep in mind:
- Size: The envelope should comfortably fit all the pieces of your wedding invitation suite, ensuring nothing gets crumpled or damaged.
- Color: Choose a colored envelope in the wedding color palette that complements the suite’s design.
- Recipient addressing: Pre-printing guest addresses either on the envelope itself or on custom mailing labels gives a polished and professional look. Use VistaPrint’s free envelope addressing service to make the process less time-consuming.
- Return addressing: Include return address labels in the wedding invitation suite envelope to make it easy for guests to mail back RSVPs.
Read our guide on addressing wedding invitations for more detailed information on proper etiquette and formatting.
Tips for wedding invitation design: Creating a unified look
A cohesive wedding invitation suite feels intentional and polished.
- Start by selecting 2-3 colors from your wedding palette and use them consistently across all pieces.
- Choose a primary typeface for headers and a complementary font for body text, mixing too many fonts creates visual chaos.
- Repeat design elements like borders, illustrations or monograms throughout the suite to tie everything together.
- Paper texture and weight should also remain consistent. If your main invitation uses 110 lb linen cardstock, your enclosure cards should use the same or a coordinating weight and finish.
Your perfect wedding invitation suite is just a step away
Putting together a wedding invitation suite is an exciting and creative process that brings together all the details of your big day. Whether you’re an engaged couple or a wedding planner, it’s about crafting a suite that looks stunning, fits the theme and keeps everyone in the loop by delivering essential information. From picking the perfect paper and printing method to adding those personal touches, every step helps to set the right tone.
Frequently asked questions about wedding invitation suites
Do I need every piece in a traditional wedding invitation suite?
No, you don’t need every piece in a traditional wedding invitation suite. The only essential component is the ceremony invitation itself. RSVP cards and enclosure cards with details are highly recommended for guest convenience, but many couples customize their suites based on their specific needs and budget. Destination weddings might require accommodation cards, while local celebrations might skip them entirely. Modern couples often consolidate information onto fewer cards or direct guests to a wedding website for additional details.
What is the difference between an enclosure card and a details card?
An enclosure card and a details card are essentially the same thing, both terms refer to additional cards included in your wedding invitation suite that provide supplementary information. “Enclosure card” is the broader term for any extra card beyond the main invitation, while “details card” specifically describes what information it contains. Some couples use multiple enclosure cards (one for accommodations, one for reception details), while others combine everything onto a single comprehensive details card.
Can I combine RSVP and detailed information into one card?
Yes, you can combine RSVP and details into one card, especially if you’re working with a limited budget or prefer a minimalist approach. This works best for smaller weddings or when you have minimal additional information to share. However, keep readability in mind, if cramming too much information onto one card makes it cluttered or difficult to read, it’s better to use separate cards. Many couples now use QR codes on their RSVP cards that link to wedding websites where guests can find all additional details.
How many invitation suites should I order?
Order one invitation suite per household, not per guest. A couple living together receives one invitation, while a single guest receives their own. Add 10-15% extra to your order for several reasons: keeping a few as keepsakes, accounting for addressing errors, having spares for last-minute guest additions and replacing any damaged invitations. If you’re inviting 100 households, order 110–115 complete suites. Don’t forget to account for vendors who might appreciate receiving an invitation as a courtesy (your photographer, venue coordinator or wedding planner).
Does the weight of an invitation suite affect postage costs?
Yes, the weight of your invitation suite directly affects postage costs. Standard first-class mail accommodates up to 1 oz, but wedding suites with multiple cards, ribbons, belly bands, wax seals and heavy cardstock often exceed this limit. Take a fully assembled suite to the post office and have it weighed before purchasing stamps. Suites weighing 1-2 oz require additional postage, and those over 2 oz cost even more. Square envelopes or thick suites may also be considered “non-machinable,” requiring manual care and extra fees. Budget for postage costs early in your planning process to avoid surprises.


